Editor’s note – This is the third article in the three-part series:
- Part 1 – Generate, load, and visualize YOLOv8 model predictions
- Part 2 – Evaluate YOLOv8 model predictions
- Part 3 – Fine-tune YOLOv8 models for custom computer vision applications (this article)
Fine-tune YOLOv8 models for custom computer vision applications
Welcome to the third and final installment in our three part series on YOLOv8! In this series, we’ll show you how to work with YOLOv8, from downloading the off-the-shelf models, to fine-tuning these models for specific use cases, and everything in between.
Throughout the series, we will be using two libraries: FiftyOne, the open source computer vision toolkit, and Ultralytics, the library that will give us access to YOLOv8.
Here in Part 3, we’ll demonstrate how to fine-tune a YOLOv8 model for your specific use case.
This post is organized as follows:
- Parts 1 and 2 recap
- Defining our use case
- Choosing training data
- Fine-tuning the YOLOv8 model
- Assessing the improvement
Continue reading to learn how you can incorporate YOLOv8 models into your computer vision workflows!
Parts 1 and 2 recap
In Part 1, we loaded the validation split of the COCO 2017 dataset, into FiftyOne with ground truth object detections. We then generated predictions with the YOLOv8n detection model from the Ultralytics YOLOv8 Github and added them to our dataset in the yolov8n label field on our samples.
In Part 2, we used FiftyOne’s Evaluation API to evaluate the quality of these detections. We found that this base model had relatively good precision, but struggled with recall for certain classes. When we dug into the details, we saw that for certain classes like the book class, imperfections in the COCO ground truth labels were at least part of the problem, but for other classes like bird, the model could benefit from fine-tuning on a broader set of examples.
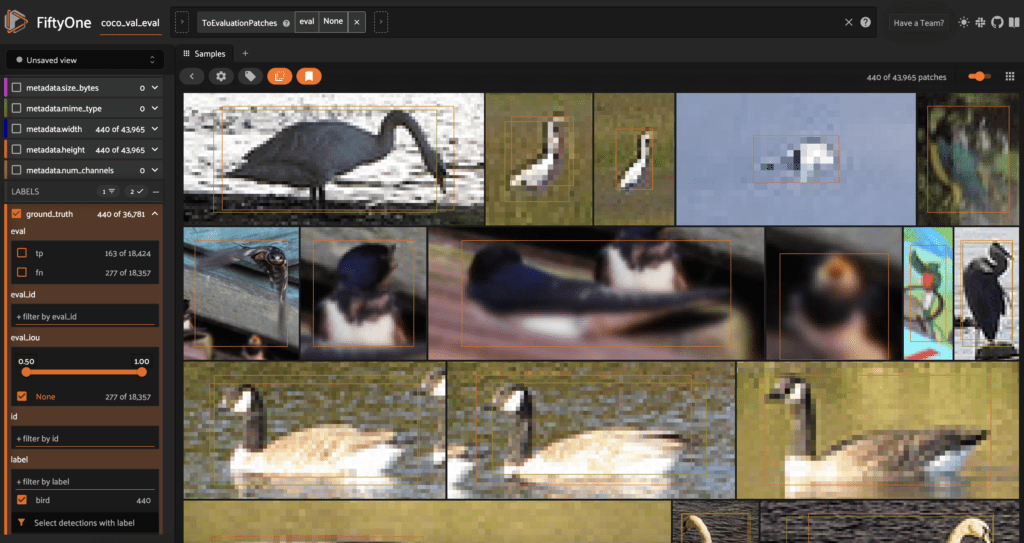
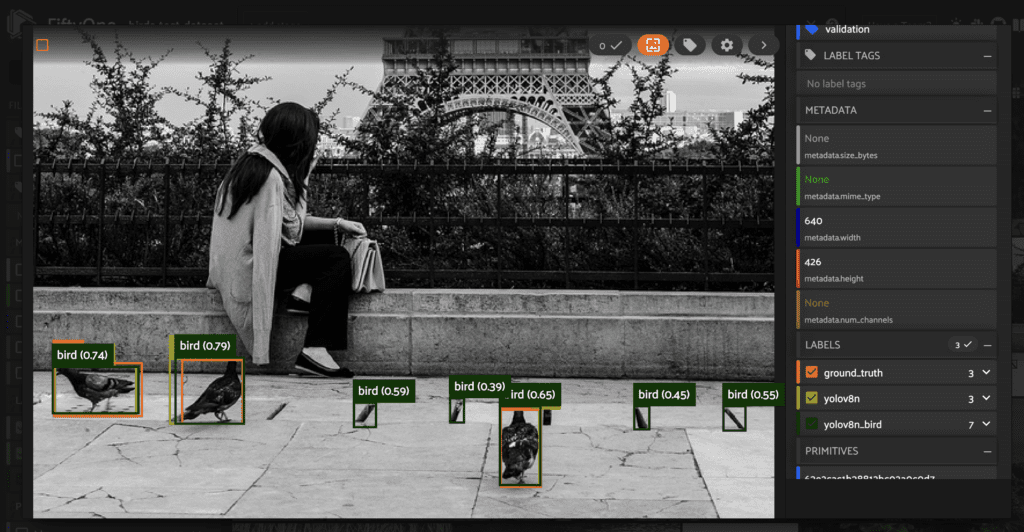
bird detections in the COCO validation split.Detecting birds with YOLOv8
               precision    recall  f1-score   support

       person       0.85      0.68      0.76     11573
          car       0.71      0.52      0.60      1971
        chair       0.62      0.34      0.44      1806
         book       0.61      0.12      0.20      1182
       bottle       0.68      0.39      0.50      1051
          cup       0.61      0.44      0.51       907
 dining table       0.54      0.42      0.47       697
traffic light       0.66      0.36      0.46       638
         bowl       0.63      0.49      0.55       636
      handbag       0.48      0.12      0.19       540
         bird       0.79      0.39      0.52       451
         boat       0.58      0.29      0.39       430
        truck       0.57      0.35      0.44       415
        bench       0.58      0.27      0.37       413
     umbrella       0.65      0.52      0.58       423
          cow       0.81      0.61      0.70       397
       banana       0.68      0.34      0.45       397
       carrot       0.56      0.29      0.38       384
   motorcycle       0.77      0.58      0.66       379
     backpack       0.51      0.16      0.24       371

    micro avg       0.76      0.52      0.61     25061
    macro avg       0.64      0.38      0.47     25061
 weighted avg       0.74      0.52      0.60     25061
As we saw in the previous section, while YOLOv8 has decent performance out of the box, it may not be suitable for specific use cases without some modification. For the bird class, for example, the base YOLOv8n model only achieved 39% recall.
Suppose you’re working for a bird conservancy group, putting computer vision models in the field to track and protect endangered species. Your goal is to detect, in real time, as many birds as possible.
Given its inference speed, the YOLOv8 architecture seems like the obvious choice. However, you are not satisfied with the 39% recall in the evaluation report on the COCO validation data. Because this is a high-stakes application, you want to squeeze every last bit of performance you can out of this real-time detection architecture.
If you wanted to, you could train a new YOLOv8 detection model from scratch, as illustrated in the YOLOv8 Quickstart guide, but ideally you would like to leverage the pretrained model’s existing knowledge. Fortunately, it is pretty straightforward to fine-tune an existing YOLOv8 model.
Before continuing, let’s pare down our task. The flexible query language built into FiftyOne makes it easy to slice and dice your datasets to find interesting views in just a line of code or the click of a button in the App.
At this point, we have a FiftyOne Dataset with our COCO validation images, ground truth detections, and YOLOv8n predictions in a yolov8n label field on each sample. Given that in our use case we are only concerned with detecting birds, let’s create a test set by filtering out all non-bird ground truth detections using filter_labels(). We will also filter out the non-bird predictions, but will pass the only_matches = False argument into filter_labels() to make sure we keep images that have ground truth bird detections without YOLOv8n bird predictions.
test_dataset = dataset.filter_labels(
    "ground_truth",
    F("label") == "bird"
).filter_labels(
    "yolov8n",
    F("label") == "bird",
    only_matches=False
).clone()

test_dataset.name = "birds-test-dataset"
test_dataset.persistent = True

## set classes to just include birds
classes = ["bird"]
We then give the dataset a name, make it persistent, and save it to the underlying database. This test set has only 125 images, which we can visualize in the FiftyOne App.
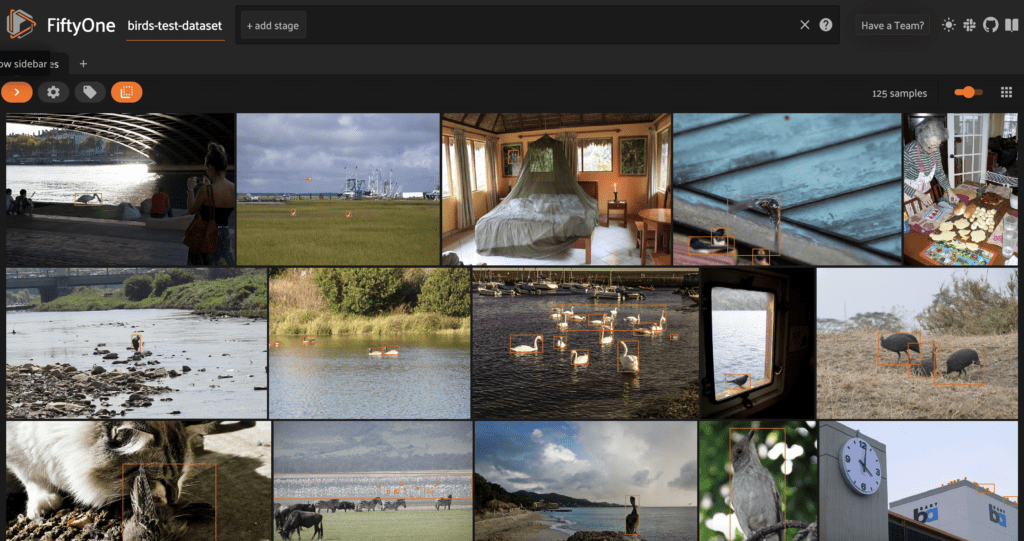
bird detections, with ground truth bounding boxes for bird detections.We can also run evaluate_detections() on this data to evaluate the YOLOv8n model’s performance on images with ground truth bird detections. We will store the results under the base evaluation key:
base_bird_results = test_dataset.evaluate_detections(
    "yolov8n",
    eval_key="base",
    compute_mAP=True,
)

print(base_bird_results.mAP())
## 0.24897924786479841

base_bird_results.print_report(classes=classes)
        precision    recall  f1-score   support

        bird       0.87      0.39      0.54       451
We note that while the recall is the same as in the initial evaluation report over the entire COCO validation split, the precision is higher. This means there are images that have YOLOv8n bird predictions but not ground truth bird detections.
The final step in preparing this test set is exporting the data into YOLOv8 format so we can run inference on just these samples with our fine-tuned model when we are done training. We will do so using the export_yolo_data() function we defined in Part 1.
export_yolo_data(
    test_dataset,
    "birds_test",
    classes
)
Choosing the training data for your YOLOv8 model
The most important component in fine-tuning a model is the data on which the model is trained. If we want our model to exhibit high performance on a specific subset of data, then our goal should be to generate a high-quality training dataset whose examples cover all expected scenarios in that subset.
This is both an art and a science. It can involve pulling in data from other datasets, annotating more data that you’ve already collected with ground truth labels, augmenting your data with tools like Albumentations, or generating synthetic data with diffusion models or GANs.
In this article, we’ll take the first approach and incorporate existing high-quality data from Google’s Open Images dataset. For a thorough tutorial on how to work with Open Images data, see Loading Open Images V6 and custom datasets with FiftyOne.
The COCO training data on which YOLOv8 was trained contains 3237 images with bird detections. Open Images is more expansive, with the train, test, and validation splits together housing 20k+ images with Bird detections.
Let’s create our training dataset. First, we’ll create a dataset, train_dataset, by loading the bird detection labels from the COCO train split using the FiftyOne Dataset Zoo, and cloning this into a new Dataset object:
train_dataset = foz.load_zoo_dataset(
    'coco-2017',
    split='train',
    classes=classes
).clone()
train_dataset.name = "birds-train-data"
train_dataset.persistent = True
train_dataset.save()
Then, we’ll load Open Images samples with Bird detection labels, passing in only_matching=True to only load the Bird labels. We then map these labels into COCO label format by changing Bird into bird.
oi_samples = foz.load_zoo_dataset(
    "open-images-v6",
    classes = ["Bird"],
    only_matching=True,
    label_types="detections"
).map_labels(
    "ground_truth",
    {"Bird":"bird"}
)
We can add these new samples into our training dataset with merge_samples():
train_dataset.merge_samples(oi_samples)
This dataset contains 24,226 samples with bird labels, or more than seven times as many birds as the base YOLOv8n model was trained on. In the next section, we’ll demonstrate how to fine-tune the model on this data using the YOLO Trainer class.
Fine-tuning YOLOv8 for a custom use case
The final step in preparing our data is splitting it into training and validation sets and exporting it into YOLO format. We will use an 80-20 train-val split, which we will select randomly using FiftyOne’s random utils.
import fiftyone.utils.random as four

## delete existing tags to start fresh
train_dataset.untag_samples(train_dataset.distinct("tags"))

## split into train and val
four.random_split(
    train_dataset,
    {"train": 0.8, "val": 0.2}
)

## export in YOLO format
export_yolo_data(
    train_dataset,
    "birds_train",
    classes,
    split = ["train", "val"]
)
Now all that is left is to do the fine-tuning! We will use the same YOLO command line syntax, but instead of setting mode=predict, we will set mode=train. We will specify the initial weights as the starting point for training, the number of epochs, image size, and batch size.
yolo task=detect mode=train model=yolov8n.pt data=birds_train/dataset.yaml epochs=100 imgsz=640 batch=16
For my fine-tuning, I used an NVIDIA TITAN GPU. I set the training to run for 100 epochs, but it had basically converged after 60 epochs, so I stopped there. You may find that your specific use case requires fewer or potentially more iterations to reach your desired performance.
Image sizes 640 train, 640 val
Using 8 dataloader workers
Logging results to runs/detect/train
Starting training for 100 epochs...

      Epoch    GPU_mem   box_loss   cls_loss   dfl_loss  Instances       Size
      1/100      6.65G      1.392      1.627      1.345         22        640: 1
                 Class     Images  Instances      Box(P          R      mAP50  m
                   all       4845      12487      0.677      0.524      0.581      0.339

      Epoch    GPU_mem   box_loss   cls_loss   dfl_loss  Instances       Size
      2/100      9.58G      1.446      1.407      1.395         30        640: 1
                 Class     Images  Instances      Box(P          R      mAP50  m
                   all       4845      12487      0.669       0.47       0.54      0.316

      Epoch    GPU_mem   box_loss   cls_loss   dfl_loss  Instances       Size
      3/100      9.58G       1.54      1.493      1.462         29        640: 1
                 Class     Images  Instances      Box(P          R      mAP50  m
                   all       4845      12487      0.529      0.329      0.349      0.188

                                            ......

      Epoch    GPU_mem   box_loss   cls_loss   dfl_loss  Instances       Size
     58/100      9.59G      1.263     0.9489      1.277         47        640: 1
                 Class     Images  Instances      Box(P          R      mAP50  m
                   all       4845      12487      0.751      0.631      0.708      0.446

      Epoch    GPU_mem   box_loss   cls_loss   dfl_loss  Instances       Size
     59/100      9.59G      1.264     0.9476      1.277         29        640: 1
                 Class     Images  Instances      Box(P          R      mAP50  m
                   all       4845      12487      0.752      0.631      0.708      0.446

      Epoch    GPU_mem   box_loss   cls_loss   dfl_loss  Instances       Size
     60/100      9.59G      1.257     0.9456      1.274         41        640: 1
                 Class     Images  Instances      Box(P          R      mAP50  m
                   all       4845      12487      0.752      0.631      0.709      0.446
With fine-tuning complete, we can generate predictions on our test data with the “best” weights found during the training process, which are stored at runs/detect/train/weights/best.pt:
yolo task=detect mode=predict model=runs/detect/train/weights/best.pt source=birds_test/images/val save_txt=True save_conf=True
And load these predictions onto our data and visualize the predictions in the FiftyOne App:
filepaths = test_dataset.values("filepath")
prediction_filepaths = [get_prediction_filepath(fp, run_number=2) for fp in filepaths]
test_dataset.set_values(
    "yolov8n_bird_det_filepath",
    prediction_filepaths
)

add_yolo_detections(
    birds_test_dataset,
    "yolov8n_bird",
    "yolov8n_bird_det_filepath",
    classes
)
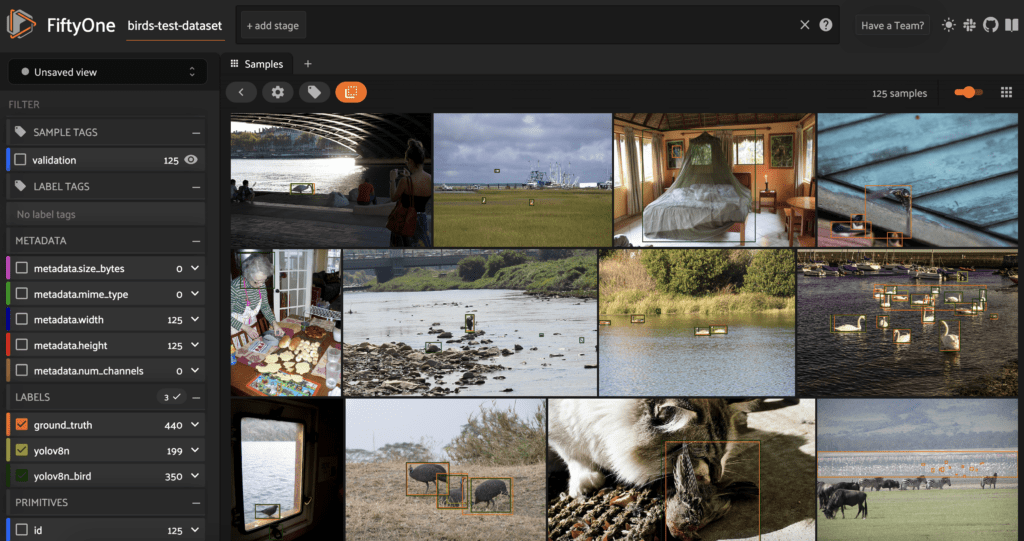
bird detections.Assessing YOLOv8 model performance improvement
On a holistic level, we can compare the performance of the fine-tuned model to the original, pretrained model by stacking their standard metrics against each other.
The easiest way to get these metrics is with FiftyOne’s Evaluation API:
finetune_bird_results = test_dataset.evaluate_detections(
    "yolov8n_bird",
    eval_key="finetune",
    compute_mAP=True,
)
From this, we can immediately see improvement in the mean average precision (mAP):
print("yolov8n mAP: {}.format(base_bird_results.mAP()))
print("fine-tuned mAP: {}.format(finetune_bird_results.mAP()))
yolov8n mAP: 0.24897924786479841
fine-tuned mAP: 0.31339033693212076
Printing out a report, we can see that the recall has improved from 0.39 to 0.56. This major improvement offsets a minor dip in precision, giving an overall higher F1 score (0.67 compared to 0.54).
              precision    recall  f1-score   support

        bird       0.81      0.56      0.67       506
We can also look more closely at individual images to see where the fine-tuned model is having trouble. When we do so, we can see that the model struggles to correctly handle small features. This is true for both false positives and false negatives.
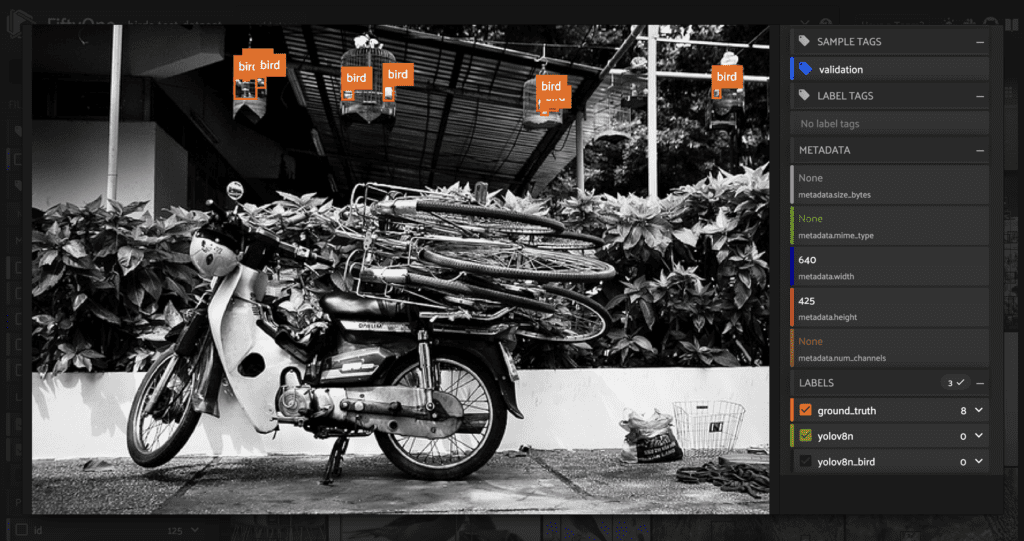
bird objects are not identified by the model.This poor performance could be in part due to quality of the data, as many of these features are grainy. It could also be due to the training parameters, as both the pretraining and fine-tuning for this model used an image size of 640 pixels, which might not allow for fine-grained details to be captured.
To further improve the model’s performance, we could try a variety of approaches, including:
- Using image augmentation to increase the proportion of images with small birds
- Gathering and annotating more images with small birds
- Increasing the image size during fine-tuning
Conclusion
The fine-tuning presented in the previous section is only for the purpose of illustration.
While YOLOv8 represents a step forward for real-time object detection and segmentation models, out-of-the-box it’s aimed at general purpose uses. Before deploying the model, it is essential to understand how it performs on your data. Only then can you effectively fine-tune the YOLOv8 architecture to suit your specific needs.
In this series, we have shown you how you can use FiftyOne to visualize, evaluate, and better understand YOLOv8 model predictions.
While YOLO may only look once, a conscientious computer vision engineer or researcher certainly looks twice (or more)!
Join the FiftyOne community!
Join the thousands of engineers and data scientists already using FiftyOne to solve some of the most challenging problems in computer vision today!
- 1,350+ FiftyOne Slack members
- 2,550+ stars on GitHub
- 3,200+ Meetup members
- Used by 245+ repositories
- 56+ contributors

