Datasets and their annotations are often stored in very different formats. FiftyOne allows for easy loading and visualization of any image dataset and labels.
DataFrames are a standard way of storing tabular data with various tools that exist to visualize the data in different ways. Image and video datasets, on the other hand, do not have a standard format for storing their data and annotations. Nearly every dataset that is developed creates a new schema with which to store their raw data, bounding boxes, sample-level labels, etc.
I have been working on an open-source machine learning tool called FiftyOne that can help ease the pain of having to write custom loading, visualization, and conversion scripts whenever you use a new dataset. FiftyOne supports multiple dataset formats out of the box including MS-COCO, YOLO, Pascal VOC, and more. However, if you have a dataset format not provided out-of-the-box, you can still easily load it into FiftyOne manually.
Why would you want your data in FiftyOne? FiftyOne provides a highly functional App and API that will let you quickly visualize your dataset, generate interesting queries, find annotation mistakes, convert it to other formats, load it into a zoo of models, and more.
This blog post will walk you through how to load image-level classifications, object detections, segmentations, and visual relationships into FiftyOne, visualize them, and convert them to other formats. I’ll be using Open Images V6 which was released in February 2020 as a basis for this post since it contains all of these data types. If you are only interested in loading Open Images V6, you can check it out in the FiftyOne Dataset Zoo and load it in one line of code! If you have your own dataset that you want to load, adjust the code in this post to parse the format that your data is stored in.
Open Images V6
Open Images is a dataset released by Google containing over 9M images with labels spanning various tasks:
- Image-level labels*
- Object bounding boxes*
- Visual relationships*
- Instance segmentation masks*
- Localized narratives
*Loaded in this post
These annotations were generated through a combination of machine learning algorithms followed by human verification on the test, validation, and subsets of the training splits. Versions of this dataset are also used in the Open Images Challenges on Kaggle.
Open Images V6 introduced localized narratives, which are a novel form of multimodal annotations consisting of a voiceover and mouse trace of an annotator describing an image. FiftyOne support for localized narratives is currently in the works.
A New Way to Download and Evaluate Open Images!
[Updated May 12, 2021] After releasing this post, we collaborated with Google to support Open Images V6 directly through the FiftyOne Dataset Zoo. It is now as easy as this to load Open Images, data, annotations, and all:
import fiftyone.zoo as foz

oi_dataset = foz.load_zoo_dataset("open-images-v6", split="validation")
With this implementation in FiftyOne, you can also specify any subset of Open Images with parameters like classes, split, max_samples, and more:
import fiftyone as fo
import fiftyone.zoo as foz

dataset = foz.load_zoo_dataset(
    "open-images-v6",
    "validation",
    label_types=["detections", "classifications"],
    classes = ["Dog", "Cat"],
    max_samples=1000,
    seed=51,
    shuffle=True,
    dataset_name="open-images-dog-cat",
)

session = fo.launch_app(dataset)
Additionally, if you are training a model on Open Images, FiftyOne now supports Open Images style evaluation allowing you to produce the same mAP metrics used in the Open Images challenges. The benefit of using FiftyOne for this is that it also stores instance-level true positive, false positive, and false negative results allowing you to not rely only on aggregate dataset-wide metrics but actually get hands-on with your model results and find out how to best improve performance.
results = fo.evaluate_detections(
    dataset,
    pred_field="predictions",
    gt_field="detections",
    pos_label_field="positive_labels",
    neg_label_field="negative_labels",
    hierarchy = dataset.info["hierarchy"],
    method = "open-images",
    expand_pred_hierarchy=True,
)
>> For more information check out this post or this tutorial!
Open Images Label Formats
The previous section shows the best way to load the Open Images dataset. However, FiftyOne also lets you easily load custom datasets. The next few sections show how to load a dataset into FiftyOne from scratch. We are using Open Images as the example dataset for this since it contains a rich variety of label types.
Note: The code in the following sections is meant to be adapted to your own datasets, it does not need to be used to load Open Images. Use the examples above if you are only interested in loading the Open Images dataset.
In this “Open Images Label Formats” section, we describe the format used by Google to store Open Images annotations on disk. We will use this information to write the parsers to load this dataset into FiftyOne in the next “Loading custom datasets into FiftyOne” section.
Downloading Data Locally
The AWS download links for the training split (513 GB), validation split (12 GB), and testing split (36 GB) can be found at Open Images GitHub repository. Annotations for the tasks that you are interested in can be downloaded directly from the Open Images website.
We will be using samples from the test split for this example. You can download the entire test split (36 Gb!) with the following commands:
pip install awscli
aws s3 --no-sign-request sync s3://open-images-dataset/test ./open-images/test/
Alternatively, I will be downloading just a few images from the test split further down in this post.
We will also need to download the relevant annotation files for each task that are all found here: https://storage.googleapis.com/openimages/web/download.html
Image-Level Labels
Every image in Open Images can contain multiple image-level labels across hundreds of classes. These labels are split into two types, positive and negative. Positive labels are classes that have been verified to be in the image while negative labels are classes that are verified to not be in the image. Negative labels are useful because they are generally specified for classes that you may expect to appear in a scene but do not. For example, if there is a group of people in outfits on a field, you may expect there to be a ball . If there isn’t one, that would be a good negative label.
wget -P labels https://storage.googleapis.com/openimages/v5/test-annotations-human-imagelabels-boxable.csv
Below is a sample of the contents of this file:
ImageID,Source,LabelName,Confidence
000026e7ee790996,verification,/m/0cgh4,0
000026e7ee790996,verification,/m/04hgtk,0
...
We need the class list for both labels and detections:
wget -P labels https://storage.googleapis.com/openimages/v5/class-descriptions-boxable.csv
Below is a sample of the contents of this file:
/m/011k07,Tortoise
/m/011q46kg,Container
...
Detections
Objects are localized and labeled with the same classes as the image-level labels. Additionally, each detection contains boolean attributes indicating if the object is occluded, truncated, representing a group of other objects, inside another object, or a depiction of the object (like a cartoon).
wget -P detections https://storage.googleapis.com/openimages/v5/test-annotations-bbox.csv
Below is a sample of the contents of this file:
ImageID,Source,LabelName,Confidence,XMin,XMax,YMin,YMax,IsOccluded,IsTruncated,IsGroupOf,IsDepiction,IsInside
000026e7ee790996,xclick,/m/07j7r,1,0.071875,0.1453125,0.20625,0.39166668,0,1,1,0,0
000026e7ee790996,xclick,/m/07j7r,1,0.4390625,0.571875,0.26458332,0.43541667,0,1,1,0,0
...
Visual Relationships
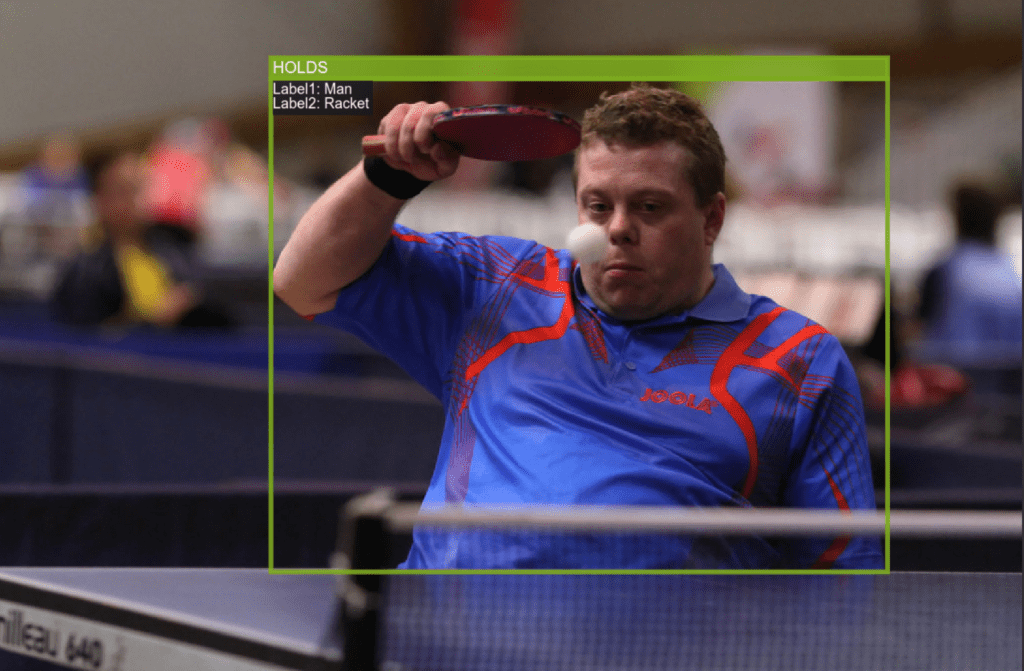
Relationships are labeled between two object detections. Examples are if one object is wearing another. The most common relationship is is, indicating if an object is some attribute (like if a handbag is leather). The annotations for these relationships include the bounding boxes and labels of both objects as well as the label for the relationship.
wget -P relationships https://storage.googleapis.com/openimages/v6/oidv6-test-annotations-vrd.csv
wget -P relationships https://storage.googleapis.com/openimages/v6/oidv6-attributes-description.csv
Below is a sample of the contents of the relationships file:
ImageID,LabelName1,LabelName2,XMin1,XMax1,YMin1,YMax1,XMin2,XMax2,YMin2,YMax2,RelationshipLabel
9553b9608577b74b,/m/04yx4,/m/017ftj,0.023404,0.985106,0.038344,0.981595,0.238298,0.759574,0.349693,0.529141,wears
819903f6353b60b5,/m/03m3pdh,/m/0dnr7,0.096875,1.000000,0.095833,1.000000,0.096875,1.000000,0.095833,1.000000,is
...
Instance Segmentation
Segmentation masks are downloaded through 16 zip files each containing the masks related to images starting with 0–9 or A-F. In this example, we will only be using images starting with 0. The following command downloads just those masks, replace the 0 with 1-9 or a-f to download masks for other images.
These segmentation annotations are stored in a separate image for each object and also include the bounding box coordinates around the segmentation and the label of the segmentation.
wget -P segmentations https://storage.googleapis.com/openimages/v5/test-masks/test-masks-0.zip
unzip -d segmentations/masks segmentations/test-masks-0.zip
wget -P segmentations https://storage.googleapis.com/openimages/v5/test-annotations-object-segmentation.csv
Below is a sample of the contents of the segmentations file:
MaskPath,ImageID,LabelName,BoxID,BoxXMin,BoxXMax,BoxYMin,BoxYMax,PredictedIoU,Clicks
d0ed76e0533a914d_m01xyhv_cffd8afa.png,d0ed76e0533a914d,/m/01xyhv,cffd8afa,0.122966,0.958409,0.389892,0.998195,0.00000,
fba940ee0203b368_m08pbxl_13094a08.png,fba940ee0203b368,/m/08pbxl,13094a08,0.460938,0.551562,0.387500,0.572917,0.00000,
...

Preprocessing
We are only going to use a small subset of the dataset in this example to make it easy to follow along with. Additionally, since we want to load a lot of different types of annotations, we need to find some samples that are compatible with all of our labels.
Let’s load in the annotations from the csv files we downloaded and parse them to find a subset of images we want to use.
import csv

with open("detections/test-annotations-bbox.csv") as f:
    reader = csv.reader(f, delimiter=',')
    det_data = [row for row in reader]

with open("labels/test-annotations-human-imagelabels-boxable.csv") as f:
    reader = csv.reader(f, delimiter=',')
    lab_data = [row for row in reader]

with open("relationships/oidv6-test-annotations-vrd.csv") as f:
    reader = csv.reader(f, delimiter=',')
    rel_data = [row for row in reader]

with open("segmentations/test-annotations-object-segmentation.csv") as f:
    reader = csv.reader(f, delimiter=',')
    seg_data = [row for row in reader]

# Find intersection of ImageIDs with all annotations
det_ids = {l[0] for l in det_data[1:]}
lab_ids = {l[0] for l in lab_data[1:]}
rel_ids = {l[0] for l in rel_data[1:]}

# We only downloaded the zip for files starting with "0"
seg_ids = {l[1] for l in seg_data[1:] if l[1][0] == "0"}

valid_ids = det_ids & lab_ids & rel_ids & seg_ids
We now have a list of valid_ids that contains all of the annotations we want to look at. Let’s choose a subset of 100 of those and download the corresponding images following what is done in the official Open Images download script.
pip install boto3
import boto3
import botocore
import os

BUCKET_NAME = 'open-images-dataset'

bucket = boto3.resource(
  's3', config=botocore.config.Config(
    signature_version=botocore.UNSIGNED)).Bucket(BUCKET_NAME)

num_ids = 100

os.makedirs('images/test', exist_ok=True)

for image_id in list(valid_ids)[:num_ids]:
  bucket.download_file(f'test/{image_id}.jpg',
    os.path.join('images/test/', f'{image_id}.jpg'))
The last thing we need is a mapping from the class and attribute IDs to their actual names.
import csv

with open("labels/class-descriptions-boxable.csv") as f:
    reader = csv.reader(f, delimiter=',')
    cls_data = [row for row in reader]

# Map of class IDs to class names
classes_map = {k: v for k,v in cls_data}


with open("relationships/oidv6-attributes-description.csv") as f:
    reader = csv.reader(f, delimiter=',')
    attrs_data = [row for row in reader]

# Map of attribute IDs to attribute names
attrs_map = {k: v for k,v in attrs_data}
Loading Custom Datasets into FiftyOne
You will first need to install FiftyOne through a simple pip command. It is recommended to work with FiftyOne in interactive Python sessions, so let’s install that too.
pip install fiftyone
pip install ipython
After launching ipython the first step is to create a FiftyOne Dataset.
import fiftyone as fo

dataset = fo.Dataset("open_images_v6")
If you want this dataset to exist after exiting the Python session, set the persistent attribute to True. This lets us quickly load the dataset in the future.
dataset.persistent = True
We then need to create FiftyOne Samples for each image that contain the file path to the images as well as all label information that we want to import. For each label type, we will create a corresponding object in FiftyOne and add it as a field to our samples.
Adding image-level classification labels will utilize the fo.Classifications class. Detections, segmentations, and relations can all use the fo.Detections class since it supports bounding boxes, masks, and also custom attributes assigned to each detection. These custom attributes can be used for things like IsOccluded in the detections or the two labels that a relationship is between.
The sections below outline how to create FiftyOne labels from the Open Images data we have loaded so far and then how to add them to your FiftyOne Dataset.
Classification Labels
Classification labels utilize the fo.Classification class. Since these are multi-label classifications, we will be using the fo.Classifications class to store multiple classification labels.
Additionally, we want to separate out the positive and negative labels (1 and 0 confidence respectively) into different classifications fields so we can view them separately in the App.
def create_labels(lab_data, image_id):
    pos_cls = []
    neg_cls = []
    # Get relevant data for this image
    sample_labs = [i for i in lab_data if i[0]==image_id]
    for sample_lab in sample_labs:
        # sample_lab reference: [ImageID,Source,LabelName,Confidence]
        label = classes_map[sample_lab[2]]
        conf = float(sample_lab[3])
        cls = fo.Classification(label=label, confidence=conf)

        if conf > 0.1:
            pos_cls.append(cls)
        else:
            neg_cls.append(cls)

    pos_labels = fo.Classifications(classifications=pos_cls)
    neg_labels = fo.Classifications(classifications=neg_cls)

    return pos_labels, neg_labels
Object Detections
Similar to classifications, the fo.Detections class lets you store multiple fo.Detection objects in a list. We create a detection by defining the bounding box coordinates and class label of the object. We can then add any additional attributes that we want, like IsOccluded and IsTruncated.
def create_detections(det_data, image_id):
    dets = []

    sample_dets = [i for i in det_data if i[0]==image_id]
    for sample_det in sample_dets:
        # sample_det reference: [ImageID,Source,LabelName,Confidence,XMin,XMax,YMin,YMax,IsOccluded,IsTruncated,IsGroupOf,IsDepiction,IsInside]
        label = classes_map[sample_det[2]]
        xmin = float(sample_det[4])
        xmax = float(sample_det[5])
        ymin = float(sample_det[6])
        ymax = float(sample_det[7])

        # Convert to [top-left-x, top-left-y, width, height]
        bbox = [xmin, ymin, xmax-xmin, ymax-ymin]

        detection = fo.Detection(bounding_box=bbox, label=label)

        detection["IsOccluded"] = bool(int(sample_det[8]))
        detection["IsTruncated"] = bool(int(sample_det[9]))
        detection["IsGroupOf"] = bool(int(sample_det[10]))
        detection["IsDepiction"] = bool(int(sample_det[11]))
        detection["IsInside"] = bool(int(sample_det[12]))

        dets.append(detection)

    detections = fo.Detections(detections=dets)

    return detections
Visual Relationships
Relationships are best represented in FiftyOne through fo.Detections since a relationship contains a bounding box, relationship label, and object labels, all of which can be stored in a detection. We are going to have the bounding box of the relationship encompass the bounding boxes of both objects it pertains to. We add the labels of each object as additional custom fields to the detection.
It should be noted, that you could easily also add the two objects that make up the relationship as individual detections, not doing so was just a design choice for this post.
def create_relationships(rel_data, image_id):
    rels = []
    sample_rels = [i for i in rel_data if i[0]==image_id]
    for sample_rel in sample_rels:
        # sample_rel reference: [ImageID,LabelName1,LabelName2,XMin1,XMax1,YMin1,YMax1,XMin2,XMax2,YMin2,YMax2,RelationshipLabel]
        label1 = classes_map[sample_rel[1]]

        attribute = False
        if sample_rel[2] in classes_map:
            label2 = classes_map[sample_rel[2]]
        else:
            label2 = attrs_map[sample_rel[2]]
            attribute = True

        label_rel = sample_rel[-1]

        xmin1 = float(sample_rel[3])
        xmax1 = float(sample_rel[4])
        ymin1 = float(sample_rel[5])
        ymax1 = float(sample_rel[6])

        xmin2 = float(sample_rel[7])
        xmax2 = float(sample_rel[8])
        ymin2 = float(sample_rel[9])
        ymax2 = float(sample_rel[10])

        xmin_int = min(xmin1, xmin2)
        ymin_int = min(ymin1, ymin2)
        xmax_int = max(xmax1, xmax2)
        ymax_int = max(ymax1, ymax2)

        # Convert to [top-left-x, top-left-y, width, height]
        bbox_int = [xmin_int, ymin_int, xmax_int-xmin_int, ymax_int-ymin_int]

        detection_rel = fo.Detection(bounding_box=bbox_int, label=label_rel)

        detection_rel["Label1"] = label1
        detection_rel["Label2"] = label2

        rels.append(detection_rel)

    relationships = fo.Detections(detections=rels)

    return relationships
Segmentations
We can once again use fo.Detections to store segmentations since a detection contains an optional mask argument that accepts a NumPy array and will scale it to the bounding box region. The segmentations in Open Images also contain a bounding box around the mask as well as the instance label, all of which is added to the detection objects.
def create_segmentations(seg_data, image_id):
    segs = []
    sample_segs = [i for i in seg_data if i[1]==image_id]
    for sample_seg in sample_segs:
        # sample_seg reference: [MaskPath,ImageID,LabelName,BoxID,BoxXMin,BoxXMax,BoxYMin,BoxYMax,PredictedIoU,Clicks]
        label = classes_map[sample_seg[2]]
        xmin = float(sample_seg[4])
        xmax = float(sample_seg[5])
        ymin = float(sample_seg[6])
        ymax = float(sample_seg[7])

        # Convert to [top-left-x, top-left-y, width, height]
        bbox = [xmin, ymin, xmax-xmin, ymax-ymin]

        # Load boolean mask
        mask_path = os.path.join("segmentations/masks", sample_seg[0])
        mask = cv2.imread(mask_path, cv2.IMREAD_GRAYSCALE) > 122
        h,w = mask.shape
        cropped_mask = mask[int(ymin*h):int(ymax*h), int(xmin*w):int(xmax*w)]

        segmentation = fo.Detection(bounding_box=bbox, label=label,
                mask=cropped_mask)

        segs.append(segmentation)

    segmentations = fo.Detections(detections=segs)

    return segmentations
Creating FiftyOne Samples
Now that we defined the functions to take in Open Images data and return FiftyOne labels, we can create samples and add these labels to them.
Samples only need a filepath to be instantiated and we can add any FiftyOne labels to a sample. Once the sample is created, we can add it to the dataset and continue until all of our data is loaded.
# Add Samples to Dataset
for image_id in list(valid_ids)[:num_ids]:
    sample = fo.Sample(filepath=os.path.join("images/test/%s.jpg" % image_id))

    # Add Labels
    pos_labels, neg_labels = create_labels(lab_data, image_id)
    sample["positive_labels"] = pos_labels
    sample["negative_labels"] = neg_labels

    # Add Detections
    detections = create_detections(det_data, image_id)
    sample["detections"] = detections

    # Add Segmentations
    segmentations = create_segmentations(seg_data, image_id)
    sample["segmentations"] = segmentations

    # Add Relationships
    relationships = create_relationships(rel_data, image_id)
    sample["relationships"] = relationships

    dataset.add_sample(sample)
Visualizing and Exploring
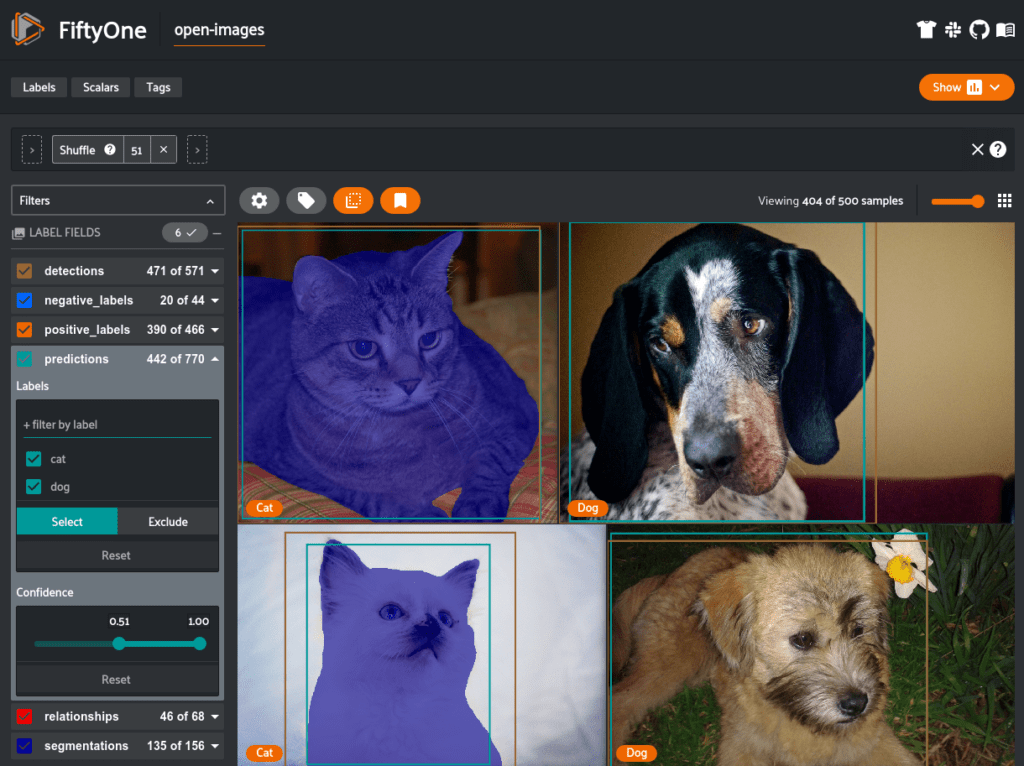
Once we have our data loaded into a FiftyOne dataset, we can launch the App and start exploring.
session = fo.launch_app(dataset)
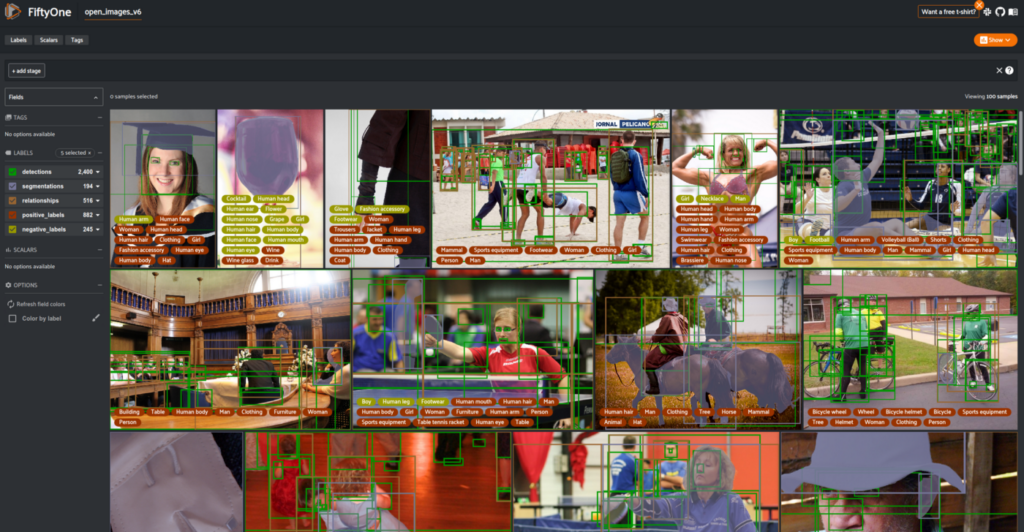
In the App, we can select which of the label fields that we want to view, look at individual samples in an expanded view, and also view the distributions of labels.
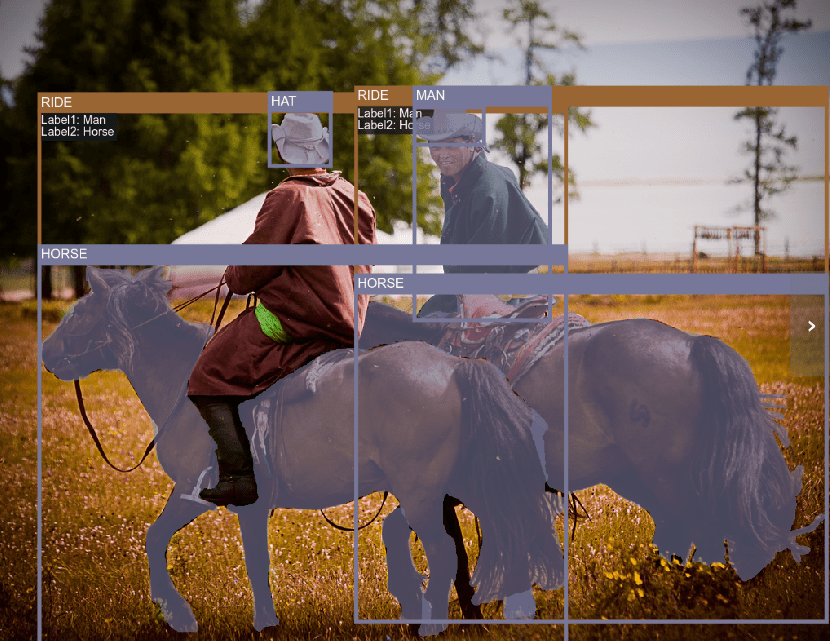
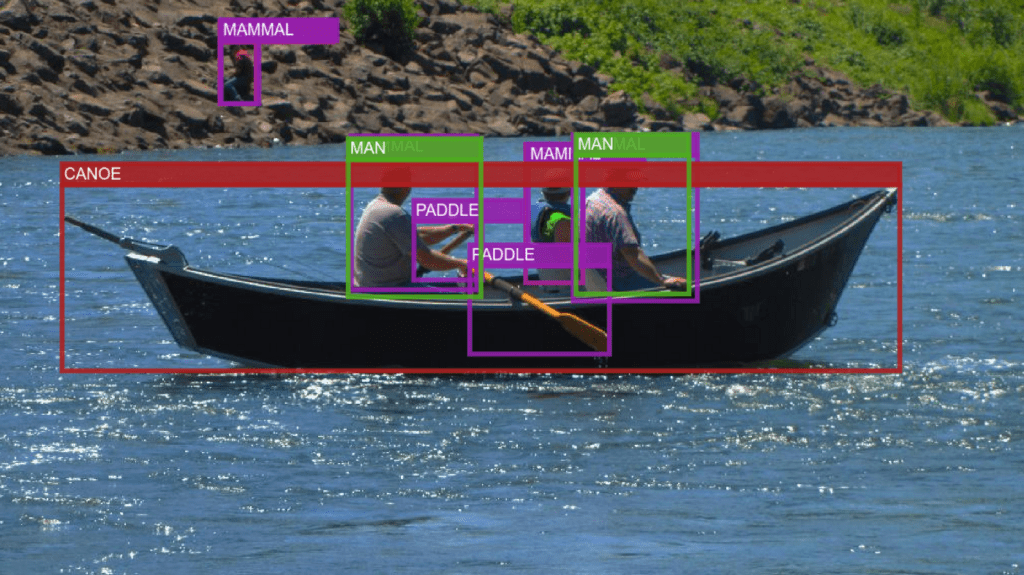
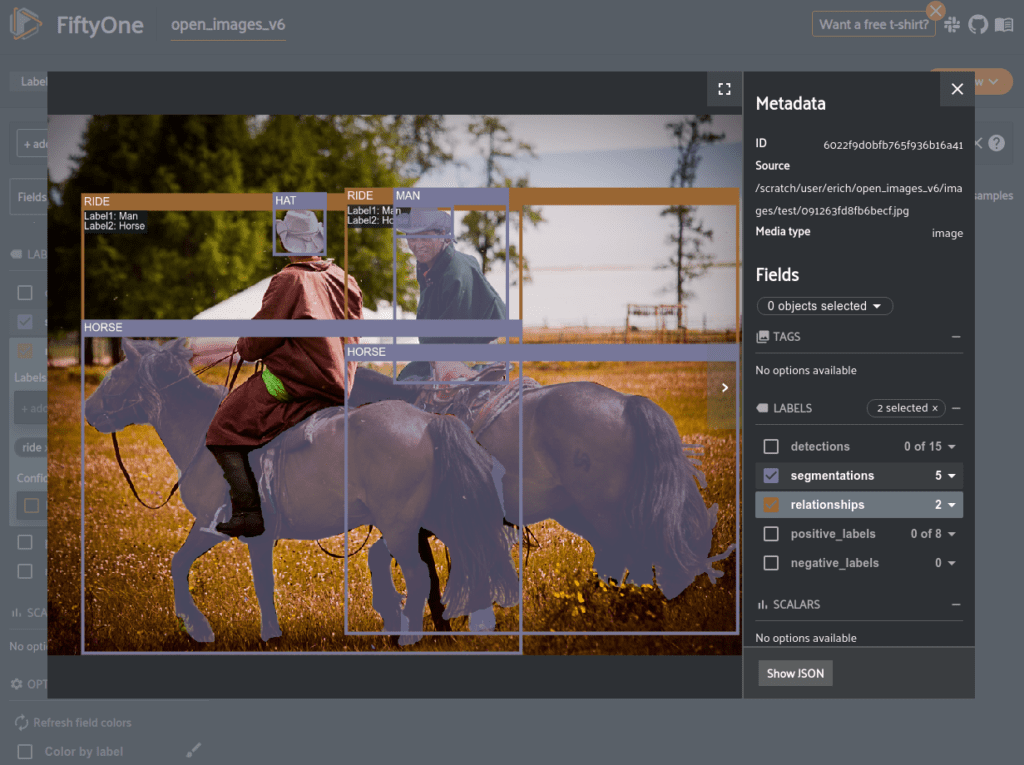
Opening a sample in the expanded view lets you visualize the attributes we added, like the labels of a relationship. For example, we can see that there are two Ride relationships between Man and Horse in the image below.
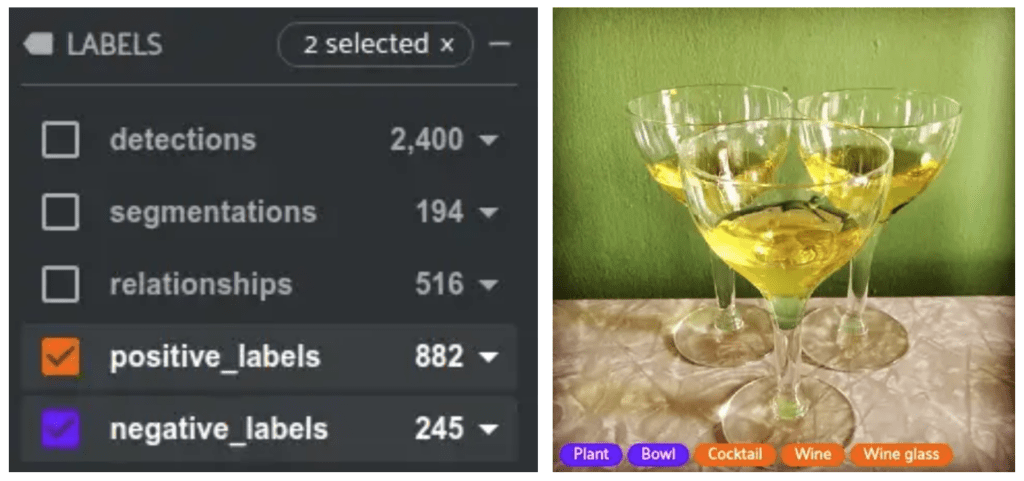
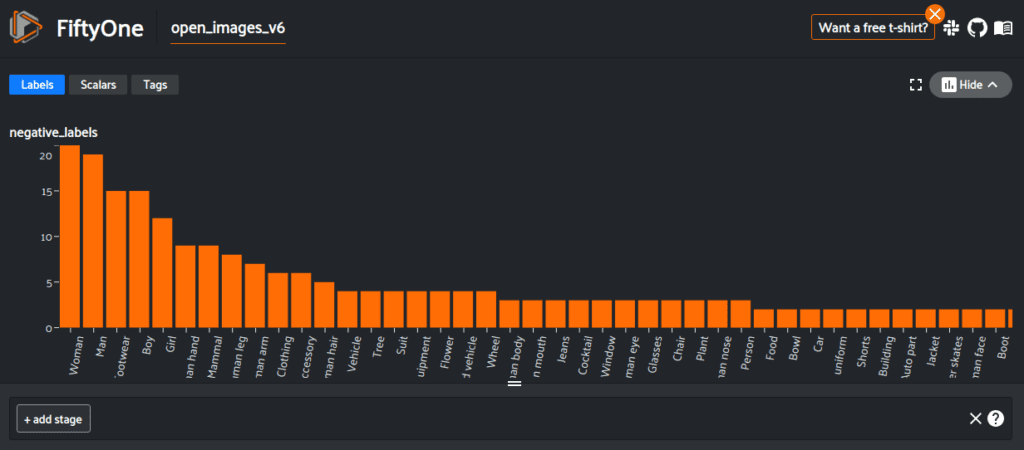
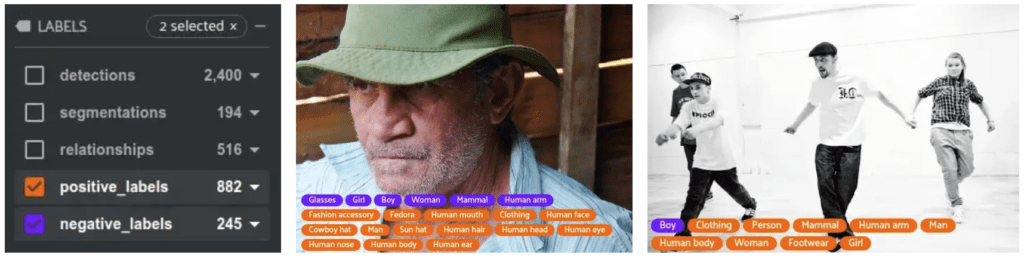
Being able to visualize our dataset easily lets us quickly spot check the data. For example, it appears that the Mammal label has an inconsistent meaning between different samples. Below are two images containing humans, one has Mammal as a negative_label and the other has Mammal as a positive_label.
Queries
One of the cutting-edge features that FiftyOne provides is the ability to interact closely with your dataset in code and in the App. This lets you write sophisticated queries that would otherwise require a large amount of scripting.
For example, say that we want build a subset of Open Images containing close up images of faces. We can create a view into the dataset that will let us get all detections that contain a Human face with a bounding box area greater than 0.2.
from fiftyone import ViewField as F

bbox_area = F("bounding_box")[2] * F("bounding_box")[3]

large_face_view = (
    dataset
    .filter_labels(
        "detections", F("label")=="Human face", only_matches=True
    ).filter_labels(
        "detections", bbox_area > 0.2, only_matches=True
    )
)

session.view = large_face_view

Converting Formats
Once your data is in FiftyOne, you can export it in any of the formats that FiftyOne supports with just a couple of lines of code.
For example, if we want to export the detections that we added to MS-COCO format so that we can use the pycocotools evaluation on it, we can do so in one line of code in Python.
dataset.export(
    export_dir="/path/to/dir",
    dataset_type=fo.types.COCODetectionDataset,
    label_field="detections",
)
The General Formula for Loading Datasets
The easiest way to load your data is if you follow a standard format for your annotations. For example, if you just finished annotating in the open-source tool, CVAT, you can load it into FiftyOne as easily as:
import fiftyone as fo

dataset = fo.Dataset.from_dir("path/to/data", dataset_type=fo.types.CVATImageDataset)
Even if your data is in a custom format, it’s easy to manually build a FiftyOne dataset.
import fiftyone as fo

# Initialize your dataset
dataset = fo.Dataset(name)

# Get a list of image paths
images = ....

# Parse your labels into samples
for path in images:
   sample = fo.Sample(path)
   sample["label"] = fo.Classification(label=...)

   detections = []
   for det in parsed_detection_labels:
       detection = fo.Detection(label=..., bounding_box=[...])
       detections.append(detection)

   sample["detections"] = fo.Detections(detections=detections)

   dataset.add_sample(sample)

# Visualize your dataset in the FiftyOne App
session = fo.launch_app(dataset)
Once you’ve loaded your data, you can utilize the FiftyOne App to visualize and explore your dataset, use the FiftyOne Model Zoo to generate predictions on your data, export it in various formats, and more!

